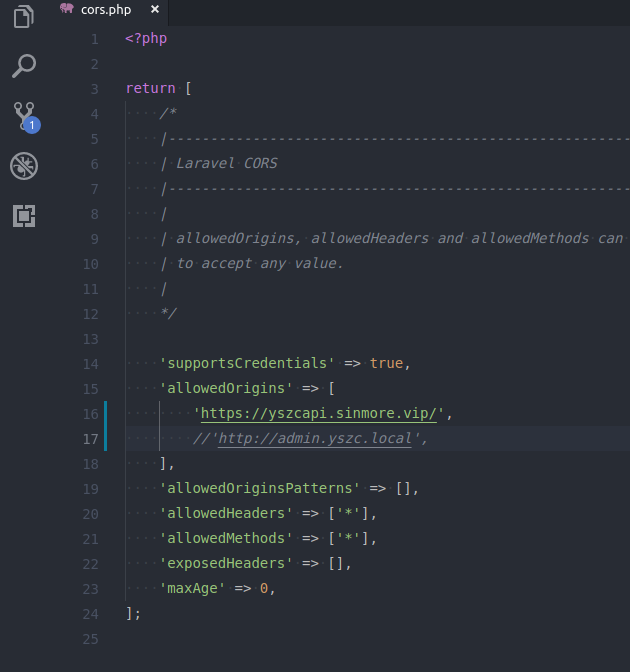
Larave Horizon 队列仪表盘

安装使用参考文档

https://learnku.com/docs/laravel/5.5/horizon/1345#configuration

本文主要记录一些使用中碰到的问题,文档有的不再赘述.

配置文件介绍

 /*
    |--------------------------------------------------------------------------
    | Horizon Redis Connection
    |--------------------------------------------------------------------------
    |
    | This is the name of the Redis connection where Horizon will store the
    | meta information required for it to function. It includes the list
    | of supervisors, failed jobs, job metrics, and other information.
    |
    */

    'use' => 'payhandle',

指定horizon 使用的redis连接,连接配置可在config/database.php中增加

这是Horizon将存储的Redis连接的名称,它运作所需的元信息。 它包括清单主管,失业,工作指标和其他信息。

/*
    |--------------------------------------------------------------------------
    | Horizon Redis Prefix
    |--------------------------------------------------------------------------
    |
    | This prefix will be used when storing all Horizon data in Redis. You
    | may modify the prefix when you are running multiple installations
    | of Horizon on the same server so that they don't have problems.
    |
    */

    'prefix' => env('HORIZON_PREFIX', 'horizon:'),

horizon 在redis中使用的存储前缀, 使用同一名称时,可以负载均衡水平扩展,不会重复处理队列中的任务.
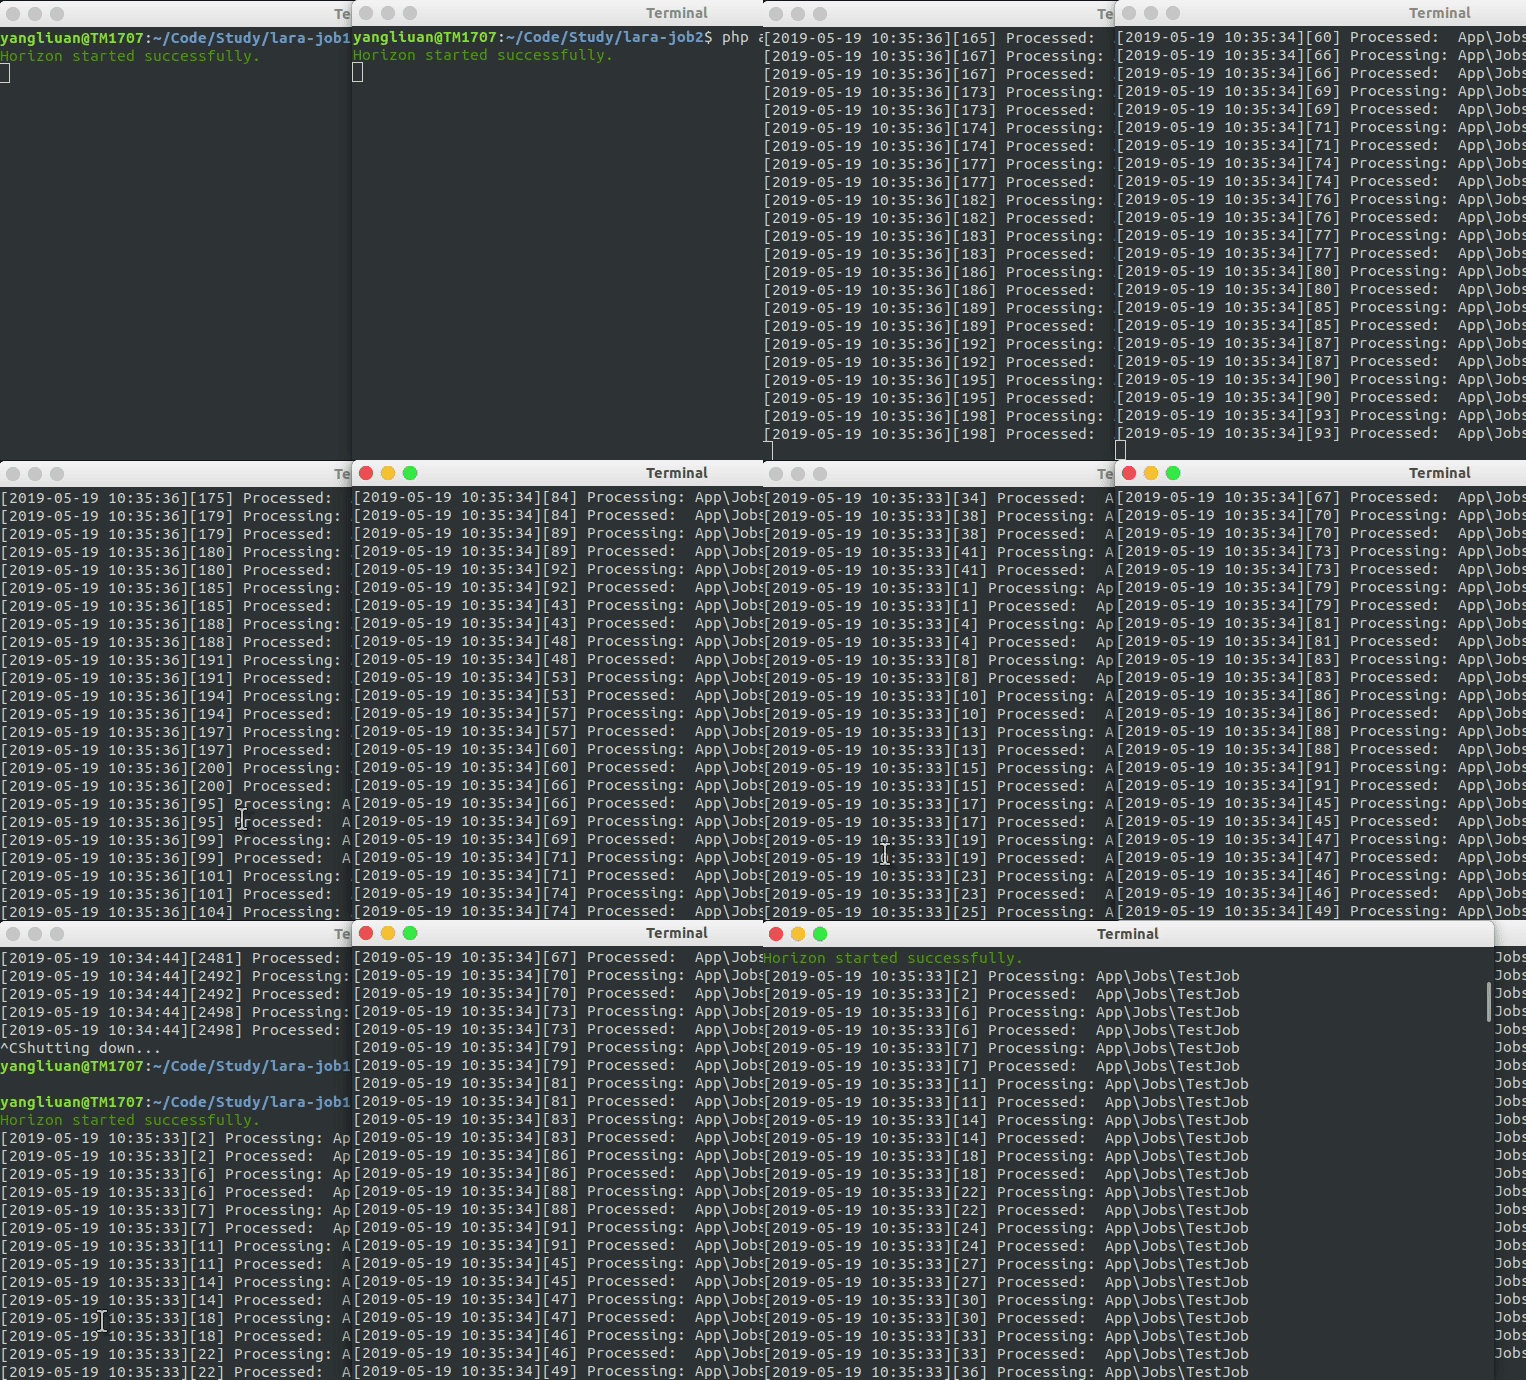
在Redis中存储所有Horizon数据时将使用此前缀。 您可以在同一台服务器运行多个安装horizon时修改前缀,以便它们没有问题。

/*
    |--------------------------------------------------------------------------
    | Horizon Route Middleware
    |--------------------------------------------------------------------------
    |
    | These middleware will get attached onto each Horizon route, giving you
    | the chance to add your own middleware to this list or change any of
    | the existing middleware. Or, you can simply stick with this list.
    |
    */

    'middleware' => ['web'],

Horizon设置的路由中间件

这些中间件将附加到每个Horizon路由上,为您提供机会将您自己的中间件添加到此列表或更改任何现有的中间件

/*
    |--------------------------------------------------------------------------
    | Queue Wait Time Thresholds
    |--------------------------------------------------------------------------
    |
    | This option allows you to configure when the LongWaitDetected event
    | will be fired. Every connection / queue combination may have its
    | own, unique threshold (in seconds) before this event is fired.
    |
    */

    'waits' => [
        'redis:default' => 60,
    ],

队列等待时间阈值

此选项允许您配置LongWaitDetected事件将被解雇的时间。 每个连接/队列组合都可以拥有它,触发此事件之前的唯一阈值(以秒为单位)。

/*
    |--------------------------------------------------------------------------
    | Job Trimming Times
    |--------------------------------------------------------------------------
    |
    | Here you can configure for how long (in minutes) you desire Horizon to
    | persist the recent and failed jobs. Typically, recent jobs are kept
    | for one hour while all failed jobs are stored for an entire week.
    |
    */

    'trim' => [
        'recent' => 60,
        'failed' => 10080,
    ],

队列清空时间

在这里,您可以配置Horizon需要多长时间(以分钟为单位)坚持最近和失败的工作。 通常,保留最近的工作 一个小时,所有失败的工作都存储了整整一个星期。

/*
    |--------------------------------------------------------------------------
    | Fast Termination
    |--------------------------------------------------------------------------
    |
    | When this option is enabled, Horizon's "terminate" command will not
    | wait on all of the workers to terminate unless the --wait option
    | is provided. Fast termination can shorten deployment delay by
    | allowing a new instance of Horizon to start while the last
    | instance will continue to terminate each of its workers.
    |
    */

    'fast_termination' => false,

快速终止

当这个选项被启用.Horizon的 terminate 命令 将不会等待,直到所有的worker(进程)终止后才终止, 除非提供了–wait选项 .快速终止可以缩短部署延时时间,允许新的 Horizon实例在最后一个实例启动时,终止他的所有worker(进程)

/*
    |--------------------------------------------------------------------------
    | Queue Worker Configuration
    |--------------------------------------------------------------------------
    |
    | Here you may define the queue worker settings used by your application
    | in all environments. These supervisors and settings handle all your
    | queued jobs and will be provisioned by Horizon during deployment.
    |
    */

    'environments' => [
        'production' => [
            'supervisor-1' => [
                'connection' => 'redis',
                'queue' => ['default'],
                'balance' => 'simple',
                'processes' => 10,
                'tries' => 3,
            ],
        ],

        'local' => [
            'supervisor-1' => [
                'connection' => 'redis',
                'queue' => ['default'],
                'balance' => 'simple',
                'processes' => 3,
                'tries' => 3,
            ],
        ],
    ],

队列worker(进程)配置

这里可以定义你应用程序在所有的环境中,使用的队列 worker(进程)的设置. 这些 supervisor 和 配置 处理你所有的队列任务 ,在部署期间将由Horizon提供

Redis超时问题

https://blog.minhow.com/2018/01/14/laravel/predis-error-reading/

1.修改 Laravel 的 config/database.php 配置文件,找到 redis 的配置项,加上 read_write_timeout 参数:
'redis' => [
        'cluster' => false,
        'default' => [
            'host' => env('REDIS_HOST', 'localhost'),
            'password' => env('REDIS_PASSWORD', null),
            'port' => env('REDIS_PORT', 6379),
            'database' => 0,
            'read_write_timeout' => 0//增加此设置
        ],
],
2.修改 Redis 的 redis.conf 配置文件,找到 timeout 参数,改成0
 timeout=0

Horizon 使用 Redis Cluster (集群)

https://github.com/laravel/horizon/issues/274

config/database.php

 'redis' => [

        'client' => env('REDIS_CLIENT', 'predis'),

        'options' => [
            'cluster' => env('REDIS_CLUSTER', 'predis'),
            'prefix' => Str::slug(env('APP_NAME', 'laravel'), '_') . '_database_',
        ],

        'clusters' => [
            'default' => [
                [
                    'host' => env('REDIS_HOST', 'localhost'),
                    'password' => env('REDIS_PASSWORD', null),
                    'port' => env('REDIS_PORT', 6379),
                    'database' => 0,
                    'read_write_timeout' => 0
                ],
            ],
            'cache' => [
                [
                    'host' => env('REDIS_HOST', '127.0.0.1'),
                    'password' => env('REDIS_PASSWORD', null),
                    'port' => env('REDIS_PORT', 6379),
                    'database' => env('REDIS_CACHE_DB', 1),
                    'read_write_timeout' => 0
                ]
            ],
            'horizon' => [
                [
                    'host' => env('REDIS_HOST', 'localhost'),
                    'password' => env('REDIS_PASSWORD', null),
                    'port' => env('REDIS_PORT', 6379),
                    'database' => 2,
                    'read_write_timeout' => 0
                ],
            ],
        ],

config/horizon.php

 'use' => env('HORIZON_USE', 'clusters.default'),

最关键的配置

Redis 集群

如果你的 Redis 队列驱动使用了 Redis 集群,你的队列名必须包含一个 key hash tag 。这是为了确保所有的 Redis 键对于一个队列都被放在同一哈希中。

key hash tag 介绍 https://learnku.com/articles/25070

config/horizon.php 需要给队列名称加{},laravel是以队列名作为redis的key

'environments' => [
        'production' => [
            'supervisor-1' => [
                'connection' => 'redis',
                'queue' => ['{default}'],
                'balance' => 'simple',
                'processes' => 10,
                'tries' => 3,
            ],
        ],

        'local' => [
            'supervisor-1' => [
                'connection' => 'redis',
                'queue' => ['{default}'],
                'balance' => 'simple',
                'processes' => 10,
                'tries' => 3,
            ],
        ],
    ],

如果使用queue队列,则修改config/queue.php,给队列名称加{}

'redis' => [
    'driver' => 'redis',
    'connection' => 'default',
    'queue' => '{default}',
    'retry_after' => 90,
],

Horizon不适用与redis集群

https://github.com/laravel/horizon/issues/274

horizon自定义队列配置

参考 https://github.com/laravel/horizon/issues/255

需求是要将队列的redis和和缓存的redis区分开,使用不同的redis。

目前尝试,默认队列一定要有,否则Job使用默认队列分发时,队列会出现不执行的情况。所以解决方案是修改config/queue.php中redis的链接来实现。

config/queue.php文件
 
'redis' => [
            'driver' => 'redis',
            'connection' => 'horizon',//修改队列连接
            'queue' => env('REDIS_QUEUE', 'default'),
            'retry_after' => 90,
            'block_for' => null,
 ],
  
//此处也可以增加自动定义队列
'horizon' => [
            'driver' => 'redis',
            'connection' => 'horizon',
            'queue' => env('HORIZON_REDIS_QUEUE', 'horizon'),
            'retry_after' => 1800,
            'block_for' => null,
],
config/horizon.php文件
默认队列要保留
'environments' => [
        'production' => [
            'supervisor-1' => [
                'connection' => 'redis',
                'queue' => ['default'],
                'balance' => 'simple',
                'processes' => 10,
                'tries' => 3,
            ],
    //此处对应horizon队列
            'horizon' => [
                'connection' => 'horizon',
                'queue' => ['horizon'],
                'balance' => 'simple',
                'processes' => 10,
                'tries' => 3,
                'timeout' => 0,
            ],
        ],

        'local' => [
            'supervisor-1' => [
                'connection' => 'redis',
                'queue' => ['default'],
                'balance' => 'simple',
                'processes' => 3,
                'tries' => 3,
            ],
 //此处对应horizon队列
            'horizon' => [
                'connection' => 'horizon',
                'queue' => ['horizon'],
                'balance' => 'simple',
                'processes' => 3,
                'tries' => 3,
                'timeout' => 0,
            ],
        ],
    ],

Laravel搭建OAuth2.0服务

OAuth2.0介绍

http://www.ruanyifeng.com/blog/2014/05/oauth_2_0.html

安装参考文档

本案例使用框架版本为5.5

https://learnku.com/docs/laravel/5.5/passport/1309#08129f

https://my.oschina.net/u/2400083/blog/1036519

composer require paragonie/random_compat=~2.0(如果出现包冲突)
composer require laravel/passport=~4.0

在 AuthServiceProvider 的 boot 方法中调用 Passport::routes 函数。这个函数会注册发出访问令牌并撤销访问令牌、客户端和个人访问令牌所必需的路由

注册配置

授权模式使用演示

客户端模式

客户端模式(Client Credentials Grant)指客户端以自己的名义,而不是以用户的名义,向”服务提供商”进行认证。严格地说,客户端模式并不属于OAuth框架所要解决的问题。在这种模式中,用户直接向客户端注册,客户端以自己的名义要求”服务提供商”提供服务,其实不存在授权问题。

生成client_id 和 client_secret

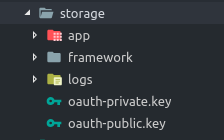
看一下storage目录是否有key ,没有key 执行 php artisan passport:keys

客户端凭据授权适用于机器到机器的认证。例如,你可以在通过 API 执行维护任务中使用此授权。要使用这种授权,你首先需要在 app/Http/Kernel.php 的 $routeMiddleware 变量中添加新的中间件:

use Laravel\Passport\Http\Middleware\CheckClientCredentials::class;

protected $routeMiddleware = [
    'client' => CheckClientCredentials::class,
];

然后在路由上追加这个中间件:

Route::get('/orders', function(Request $request) {
    ...
})->middleware('client');
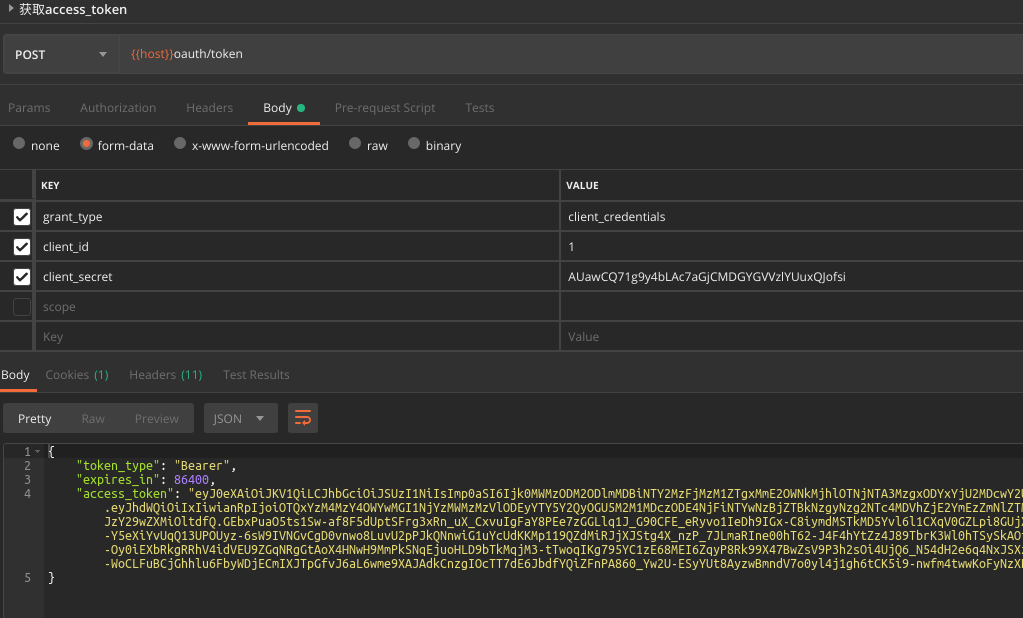
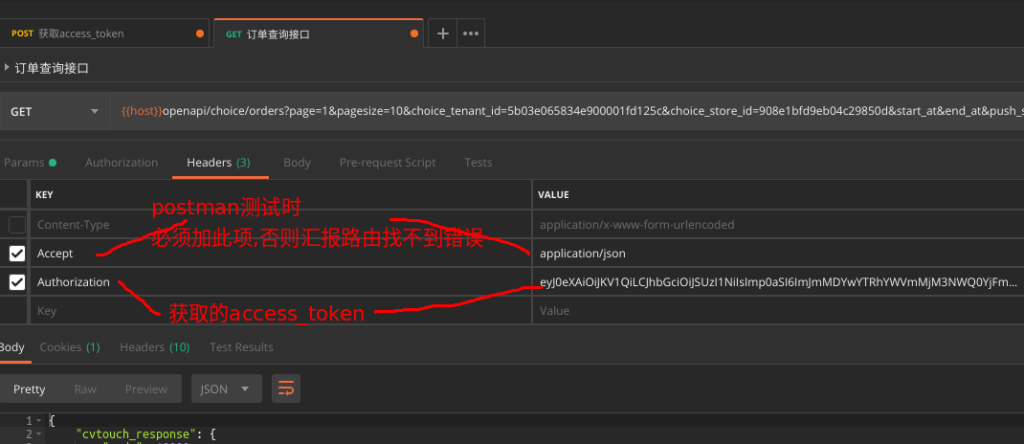
获取token示例

示例

个人访问令牌

如果用户要在不经过典型的授权码重定向流的情况下向自己发出访问令牌,可以允许用户通过应用程序的用户界面对自己发出令牌,用户可以因此顺便测试你的 API,或者也可以将其作为一种更简单的发布访问令牌的方式。

chuangjain个人访问令牌

{note} 个人访问令牌是永久有效的,就算使用了 tokensExpireIn 和 refreshTokensExpireIn 方法也不会修改它的生命周期。

token设置有效期解决方案 https://github.com/laravel/passport/issues/162

token设置有效期代码示例

<?php

namespace App\Providers;

use DateInterval;
use Illuminate\Foundation\Support\Providers\AuthServiceProvider as ServiceProvider;
use Laravel\Passport\Bridge\PersonalAccessGrant;

class AuthServiceProvider extends ServiceProvider
{
    /**
     * The policy mappings for the application.
     *
     * @var array
     */
    protected $policies = [
        'App\Model' => 'App\Policies\ModelPolicy',
    ];

    /**
     * Register any authentication / authorization services.
     */
    public function boot()
    {
        $this->registerPolicies();
        //设置个人token失效时间为7天
        $authorizarionServer = app()->make(\League\OAuth2\Server\AuthorizationServer::class);
        $authorizarionServer->enableGrantType(
            new PersonalAccessGrant(),
            new DateInterval('PT7D')
        );
    }
}

实现单一客户端登录(只有一个token生效)

https://segmentfault.com/q/1010000008481512/a-1020000008481698

https://learnku.com/laravel/t/16144

自定义认证看守器(guard)

场景:

需要非用户模型的表进行认证。比如物联网开发中,需要对设备进行认证为例。

安装步骤和配置步骤不变,请参考laravel passport文档

设备表迁移文件

Schema::create('devices', function(Blueprint $table)
        {
            $table->increments('id');
            $table->string('mac_address', 17)->default('')->comment('设备mac地址')->index('mac_address','mac_indx');
            $table->string('alias', 20)->default('')->comment('设备别名');
            $table->timestamps();
        });
        DB::statement("ALTER TABLE devices comment '设备表'");

模型配置

//设备模型需要继承用户认证模型 Illuminate\Foundation\Auth\User 
// 引用passport 的 HasApiTokens  trait
<?php

namespace App\Models;

use Laravel\Passport\HasApiTokens;
use Illuminate\Foundation\Auth\User as Authenticatable;

class Device extends Authenticatable
{
    use HasApiTokens;

    protected $table = 'devices';

    protected $fillable = ['mac_address', 'alias'];

    protected $dates = [];

    protected $casts = [];

    protected $appends = [];

    protected $hidden = [
        'pivot',
    ];
}

config/auth.php 看守器

'guards' => [
        'web' => [
            'driver' => 'session',
            'provider' => 'users',
        ],

        'api' => [
            'driver' => 'passport',
            'provider' => 'users',
        ],
       //增加设备看守器
        'device' => [
            'driver' => 'passport',
            'provider' => 'devices',
        ],
    ],


'providers' => [
        'users' => [
            'driver' => 'eloquent',
            'model' => App\Models\User::class,
        ],
      //提供者增加设备模型
        'devices' => [
            'driver' => 'eloquent',
            'model' => App\Models\Device::class,
        ],
    ],

app/Providers/AuthServiceProvider.php 服务提供者作用域配置


 public function boot()
    {
        $this->registerPolicies();

        Passport::routes();
        Passport::loadKeysFrom('');
        Passport::personalAccessTokensExpireIn(now()->addMonths(6));
        Passport::tokensCan([
            'api' => 'api',
        ]);
    }

作用域中间件配置

 protected $routeMiddleware = [
   ...
        'scopes' => \Laravel\Passport\Http\Middleware\CheckScopes::class,
        'scope' => \Laravel\Passport\Http\Middleware\CheckForAnyScope::class,
  ];

路由和控制器测试代码

Route::prefix('test')->group(function () {
    Route::post('login', [TestController::class,'login']);
    Route::get('show', [TestController::class,'show'])->middleware(['auth:device','scope:api']);
});

<?php

namespace App\Http\Controllers;

use App\Models\Device;
use App\Models\User;
use Illuminate\Http\Request;

class TestController extends Controller
{
    public function login(Request $request)
    {
        $guard_model = Device::find(1);
        $token = $guard_model->createToken('device', ['api'])->accessToken;

        return response()->json([
            'token' => $token
        ]);
    }

    public function show(Request $request)
    {
        return response()->json($request->user('device'));
    }
}

测试结果使用device guard看守器成功获取模型

PHP的运行模式

基本概念

CGI 通用网关接口  Common Gateway Interface

CGI 是Web 服务器运行外部程序的规范(协议),按CGI 编写的程序可以扩展服务器功能。CGI 应用程序能与浏览器进行交互,还可通过数据库API 与数据库服务器等外部数据源进行通信,从数据库服务器中获取数据。格式化为HTML文档后,发送给浏览器,也可以将从浏览器获得的数据放到数据库中。几乎所有服务器都支持CGI,可用任何语言编写CGI,包括流行的C、C ++、VB 和Delphi 等。CGI 分为标准CGI 和间接CGI两种。标准CGI 使用命令行参数或环境变量表示服务器的详细请求,服务器与浏览器通信采用标准输入输出方式间接CGI 又称缓冲CGI,在CGI 程序和CGI 接口之间插入一个缓冲程序,缓冲程序与CGI 接口间用标准输入输出进行通信。

功能,处理浏览器发送的表单请求,处理后并给浏览器响应(HTML).PHP就是C语言编写的CGI程序.其它ASP,JSP, .NET等

简而言之,来自客户端的HTTP POST请求将通过标准输入发送CGI程序HTML表单数据。其他数据(如URL路径和HTTP标头数据)显示为过程环境变量。

缺点

每有一个用户请求,都会先要创建CGI的子进程,然后处理请求,处理完后结束这个子进程(Fork-And-Execute模式). 这种方式开销大,请求过多和高并发是占用系统资源多.

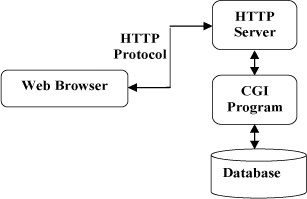
CGI结构图

FastCGI  快速通用网关接口 FastCommonGatewayInterface

FastCGI(一种二进制协议,用于将交互式程序与Web服务器连接)像是一个常驻(long-live)型的CGI,它可以一直执行着,只要激活后,不会每次都要花费时间去fork一次(这是CGI最为人诟病的fork-and-execute 模式)。它还支持分布式的运算, 即 FastCGI 程序可以在网站服务器以外的主机上执行并且接受来自其它网站服务器来的请求。

每个单独的FastCGI进程可以在其生命周期内处理许多请求,从而避免了每个请求进程创建和终止的开销。同时处理多个请求可以通过几种方式实现:通过使用具有内部多路复用的单个连接(即通过单个连接的多个请求); 通过使用多个连接; 或者通过这些技术的组合。可以配置多个FastCGI服务器,从而提高稳定性和可扩展性。

进入正题

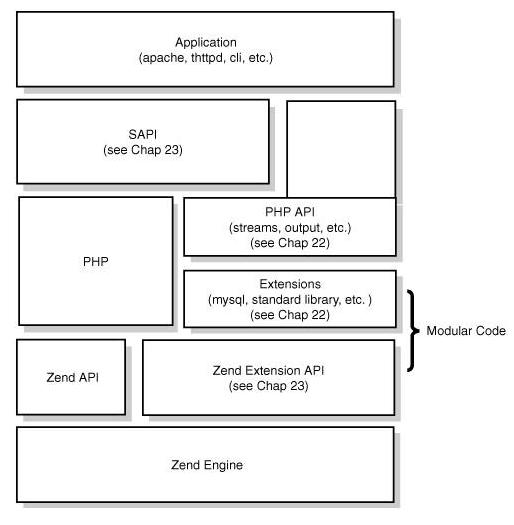
PHP结构图

SAPI

SAPI(Server Application Programming Interface,服务端应用编程端口 )是PHP的应用接口层,提供php和外部程序(web服务器和shell终端)通信的接口.PHP为不同的web服务器提供多种SAPI接口,运行模式指的就是PHP运行的是那种SAPI

获取SAPI http://php.net/manual/zh/function.php-sapi-name.php

 php_sapi_name() 和 PHP_SAPI 返回描述 PHP 所使用的接口类型(the Server API, SAPI)的小写字符串。 例如,CLI 的 PHP 下这个字符串会是 “cli”,Apache 下可能会有几个不同的值,取决于具体使用的 SAPI。 以下列出了可能的值。

可能返回的值包括了 aolserverapache、 apache2filterapache2handler、 caudiumcgi (直到 PHP 5.3), cgi-fcgicli、 cli-server、 continuityembedfpm-fcgi、 isapilitespeed、 milternsapi、 phttpdpi3webroxen、 thttpdtux 和 webjames

CLI模式

http://php.net/manual/zh/features.commandline.php

从版本 4.3.0 开始,PHP 提供了一种新类型的 CLI SAPI(Server Application Programming Interface,服务端应用编程端口)支持,名为 CLI,意为 Command Line Interface,即命令行接口。顾名思义,该 CLI SAPI 模块主要用作 PHP 的开发外壳应用。CLI SAPI 和其它 CLI SAPI 模块相比有很多的不同之处,我们将在本章中详细阐述。值得一提的是,CLI 和 CGI 是不同的 SAPI,尽管它们之间有很多共同的行为。

CLI-Server

PHP 5.4.0起, CLI SAPI 提供了一个内置的Web服务器。这个内置的Web服务器主要用于本地开发使用,不可用于线上产品http://php.net/manual/zh/features.commandline.webserver.php

CGI 模式

http://php.net/manual/zh/install.unix.commandline.php

LoadModule cgi_module modules/mod_cgi.so —cgi 模块 apache

FastCGI模式

FPM模式 

http://php.net/manual/zh/install.fpm.php

FPM(FastCGI 进程管理器)用于替换 PHP FastCGI 的大部分附加功能,对于高负载网站是非常有用的。

PHP-FPM 这种模型是非常典型的多进程同步模型,由一个master主进程多个worker进程组成.master进程创建时会创建一个sokect,但是不会处理请求,只负责调度worker进程

worker进程的生命周期,竞争的接受请求,解析FastCGI协议的数据,处理对应脚本,处理完成关闭请求,然后等待新的连接.同一时刻只能处理一个请求(同步阻塞IO).

master进程与worker进程之间不会直接通讯,master进程通过共享内存方式获取worker进程的信息,通过信号方式杀死worker进程.(进程间通讯)

缺点

每次启动都与需要重新加载php文件,浪费了一部分性能

ISAPI模式 (PHP 5.3)

ISAPI(Internet Server Application Program Interface)是微软提供的一套面向 Internet 服务的 API 接口,一个 ISAPI 的 DLL,可以在被用户请求激活后长驻内存,等待用户的另一个请求,还可以在一个 DLL 里设置多个用户请求处理函数,此外,ISAPI 的 DLL 应用程序和 WEB 服务器处于同一个进程中,效率要显著高于 CGI。由于微软的排他性,只能运行于 Windows 环境。

Module 模式  

http://php.net/manual/zh/install.unix.apache2.php

PHP 常常与 Apache 服务器搭配形成 LAMP 配套的运行环境。把 PHP 作为一个子模块集成到 Apache 中,就是 Module 模式,Apache 中的常见配置如下:

LoadModule php5_module modules/mod_php5.so

这使用了 LoadModule 命令,该命令的第一个参数是模块的名称,名称可以在模块实现的源码中找到。第二个选项是该模块所处的路径。如果需要在服务器运行时加载模块,可以通过发送信号 HUP 或者 AP_SIG_GRACEFUL 给服务器,一旦接受到该信号,Apache 将重新装载模块,而不需要重新启动服务器。通过注册到 apache2 的 ap_hook_post_config 挂钩,在 Apache 启动的时候启动此模块以接受 PHP 文件的请求。

例如,当客户端访问 PHP 文件时,Apache 就会调用 php5_module 来解析 PHP 脚本。Apache 每接收到一个请求,都会产生一个进程来连接 PHP 完成请求。在 Module 模式下,有时候会因为把 PHP 作为模块编进 Apache,而导致出现问题时很难定位是 PHP 的问题还是 Apache 的问题。

Apache MPM(多处理模块) 选择

要求 更高伸缩性的站点可以选择使用线程的 MPM,即 worker 或 event 需要可靠性或者与旧软件兼容的站点可以使用 prefork

运行方式总结

linux + nginx + php-fpm 主流 + 性能和兼容性兼顾

linux + nginx + php-cli + workman/webman 高性能 兼容原先的composer代码库

linux + nginx + php-cli (swoole-cli) 对旧代码兼容不好,如需要重建协程组件

linux + apache mpm event + php-fpm

linux + apache mpm + mod_php

I/O性能优先级

swoole(cli) > php-fpm > mod_php

相关参考

深入理解Zend SAPIs(Zend SAPI Internals) 鸟哥博客

PHP 运行模式

mod_php和mod_fastcgi和php-fpm的介绍,对比和性能数据

Apache的三种MPM模式比较:prefork,worker,event

Maatwebsite / Laravel-Excel 扩展包导入导出数据

文档 https://laravel-excel.maatwebsite.nl/3.1/getting-started/

github https://github.com/Maatwebsite/Laravel-Excel

环境要求

  • PHP: ^7.0
  • Laravel: ^5.5
  • PhpSpreadsheet: ^1.4
  • PHP扩展已php_zip启用
  • PHP扩展已php_xml启用
  • PHP扩展已php_gd2启用

安装

composer require maatwebsite/excel

laravel5.5已下版本手动添加ServiceProvider config/app.php

'providers' => [
    /*
     * Package Service Providers...
     */
    Maatwebsite\Excel\ExcelServiceProvider::class,
]

添加Facade config/app.php

'aliases' => [
    ...
    'Excel' => Maatwebsite\Excel\Facades\Excel::class,
]

发布配置

php artisan vendor:publish --provider="Maatwebsite\Excel\ExcelServiceProvider" --tag=config
或者
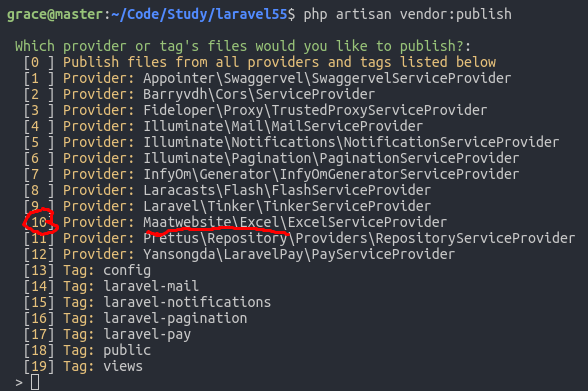
php artisan vendor:publish 然后手动选择

生成config/excel.php配置文件

导出

创建导出类

php artisan make:export UsersExport --model=App/User

导出格式

https://laravel-excel.maatwebsite.nl/3.1/exports/export-formats.html

导出方式

1.直接响应下载文件

use App\Exports\UsersExport;
use Maatwebsite\Excel\Facades\Excel;
use App\Http\Controllers\Controller;

class UsersController extends Controller 
{
    public function export() 
    {
        return Excel::download(new UsersExport, 'users.xlsx');
    }
}

2.存储到磁盘

public function storeExcel() 
{
    // Store on default disk
    Excel::store(new InvoicesExport(2018), 'invoices.xlsx');
    
    // Store on a different disk (e.g. s3)
    Excel::store(new InvoicesExport(2018), 'invoices.xlsx', 's3');
    
    // Store on a different disk with a defined writer type. 
    Excel::store(new InvoicesExport(2018), 'invoices.xlsx', 's3', Excel::XLSX);
}
  • 参数1为导出类
  • 参数2为文件名
  • 参数3为laravel存储的磁盘
  • 参数4为导出格式 详情看配置文件

从集合导出

<?php

namespace App\Exports;

use App\User;
use Maatwebsite\Excel\Concerns\FromCollection;

class UsersExport implements FromCollection
{
    public function collection()
    {
        return User::all();
    }
}
  • 实现 FromCollection 接口 的collection方法
  • collection方法内可以是任何Eloquent ORM的查询 get() first() all() pluck()等方法的返回结果(collection)也可以是通过构造方法传入的collection

从查询导出

namespace App\Exports;

use App\Invoice;
use Maatwebsite\Excel\Concerns\FromQuery;
use Maatwebsite\Excel\Concerns\Exportable;

class InvoicesExport implements FromQuery
{
    use Exportable;

    public function query()
    {
        return Invoice::query();
    }
}
  • 实现Maatwebsite\Excel\Concerns\FromQuery 的 query方法
  • query 方法内return任何Laravel Eloquent ORM的查询构造器的方法,除了获取集合的get() first() all() pluck()等方法

从视图导出

将html表格转换成excel表格,不推荐使用,不灵活,此功能对html结构有要求

队列导出

支持 FromCollection 和 FromQuery

namespace App\Exports;

use App\User;
use Maatwebsite\Excel\Concerns\FromCollection;
use Illuminate\Contracts\Queue\ShouldQueue;

class UsersExport implements FromCollection, ShouldQueue
{
    /**
     * @return \Illuminate\Support\Collection
     */
    public function collection()
    {
        return User::all();
    }
}

队列直接下载导出 控制器代码

 public function export(Request $request, Excel $excel)
 {
    return $excel->download(new UsersExport(), 'users.xlsx');
 }

队列导出存储到磁盘

public function store(Request $request)
{
   ini_set('memory_limit', '1024M');
   $result = Excel::store(new UsersExport(), 'users_store'.date('YmdHis').'.xlsx', 'public');
}
  • 数据量大时,有时会超出内存限制需要设置内存,后来没复现,没找到原因
  • 从 collection导出的方式,成功后没有发现导出excel文件,后来没复现,没有找到原因

设置表头

class InvoicesExport implements WithHeadings
{   
    public function headings(): array
    {
        return [
            '对应ExcelA列',
            '对应ExcelB列',
            ...
        ];
    }
}

要实现Maatwebsite\Excel\Concerns\WithHeadings的headings方法

每行字段值映射

public function map($code): array
{
    return [
       $A,
       (string) $B,
       0 == $C ? '未使用' : '使用',
    ];
}

要实现 Maatwebsite\Excel\Concerns\WithMapping的map方法

可以对具体值做处理

字段格式化

https://docs.laravel-excel.com/3.1/exports/column-formatting.html

namespace App\Exports;

use PhpOffice\PhpSpreadsheet\Shared\Date;//处理时间格式的类,
use PhpOffice\PhpSpreadsheet\Style\NumberFormat;//处理数字格式
use Maatwebsite\Excel\Concerns\WithColumnFormatting;
use Maatwebsite\Excel\Concerns\WithMapping;

class InvoicesExport implements WithColumnFormatting, WithMapping
{
    public function map($invoice): array
    {
        return [
            $invoice->invoice_number,
            Date::dateTimeToExcel($invoice->created_at),//时间处理
            $invoice->total
        ];
    }
    
    public function columnFormats(): array
    {
        return [
            'B' => NumberFormat::FORMAT_DATE_DDMMYYYY, 
            'C' => NumberFormat::FORMAT_CURRENCY_EUR_SIMPLE,
             //I为列头标识格式化成文本常用的比如手机号或订单号会转为科学计数法,这样可以解决
            'I' => NumberFormat::FORMAT_TEXT,
        ];
    }
}

处理日期时,建议在映射中PhpOffice\PhpSpreadsheet\Shared\Date 使用以确保正确解析日期。

设置列宽度

自动设置尺寸

namespace App\Exports;

use Maatwebsite\Excel\Concerns\ShouldAutoSize;

class InvoicesExport implements ShouldAutoSize
{
    ...
}

自定义宽度

namespace App\Exports;

use Maatwebsite\Excel\Concerns\WithColumnWidths;

class InvoicesExport implements WithColumnWidths
{
    public function columnWidths(): array
    {
        //A B 是列的标识头
        return [
            'A' => 55,
            'B' => 45,            
        ];
    }
}

常用配置修改

 /*
  |--------------------------------------------------------------------------
    Heading Row Formatter
  |--------------------------------------------------------------------------
  |
  | Configure the heading row formatter. 
  | Available options: none|slug|custom
  |
  */
  'heading_row' => [
      'formatter' => 'none',//不格式化,这样可以导入中文标题头excel
  ],

   /*
    |--------------------------------------------------------------------------
    | Transaction Handler
    |--------------------------------------------------------------------------
    |
    | By default the import is wrapped in a transaction. This is useful
    | for when an import may fail and you want to retry it. With the
    | transactions, the previous import gets rolled-back.
    |
    | You can disable the transaction handler by setting this to null.
    | Or you can choose a custom made transaction handler here.
    |
    | Supported handlers: null|db
    |
    */
    'transactions' => [
        'handler' => 'null', //取消事物,不回滚,成功导入的数据不会被回滚
    ],

composer 加速扩展包—— hirak/prestissimo

在用composer过程中会经常出现安装慢的情况。项目依赖的扩展包过多时,耗时很长,影响部署和开发。

1.是因为网络镜像问题,可以通过设置镜像源解决 https://www.yangliuan.cn/?p=172

2.因为 Composer 是单进程方式下载的, Composer 安装完一个依赖,才回去下载并安装另一个依赖

解决方案使用composer 扩展包 prestissimo

项目地址:https://github.com/hirak/prestissimo

 安装  建议采用全局安装
composer global require hirak/prestissimo

卸载

composer global remove hirak/prestissimo

基准测试 案例

$ composer create-project laravel/laravel laravel1 --no-progress --profile --prefer-dist

288s -> 26s

配置

支持composer 配置项 无需任何特殊配置 composer配置

Composer 配置镜像源

现代php开发都基于composer,由于”墙”的存在,影响了安装或更新扩展包的时候用。因此使用composer时需要配置一下国内镜像

配置镜像

全局方式

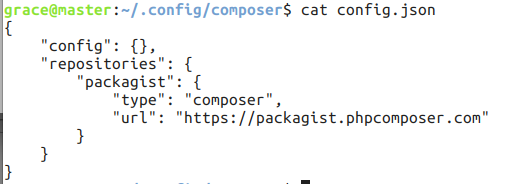
composer config -g repo.packagist composer 镜像url

该指令会修改composer 全局配置文件中的镜像url

如图 repositories 配置中 packagist url项

配置当前项目

composer config repo.packagist composer 镜像URL

该指令会在当前项目的composer.json中修改镜像url

国内镜像

镜像名地址赞助商更新频率备注
阿里云 Composer 镜像https://mirrors.aliyun.com/composer/阿里云96 秒推荐
腾讯云 Composer 镜像https://mirrors.cloud.tencent.com/composer/腾讯云24 小时
PHP 国内 Composer 镜像https://packagist.phpcomposer.com仁润股份24 小时不稳定
华为云 Composer 镜像https://repo.huaweicloud.com/repository/php/
https://mirrors.huaweicloud.com/repository/php/
华为云未知未知

如果使用ubuntu和linux开发可以用shell写个切换镜像脚本 composer.sh

laravel-cors 扩展包

跨域资源共享 参考 https://www.yangliuan.cn/?p=141

公司采用前后端分类的开发方式,每次部署项目都需要设置nginx配置或添加php header响应非常麻烦,于是在github找了一个用于设置cors跨域的扩展包,很好用。写下来备忘。

github地址https://github.com/barryvdh/laravel-cors

1.composer require barryvdh/laravel-cors

 在laravel项目执行安装,如果使用的是laravel 5.5以下版本 请在config/app.php中的providers 数组中添加 Barryvdh\Cors\ServiceProvider::class,注册该服务提供者

2.php artisan vendor:publish –provider=”Barryvdh\Cors\ServiceProvider”

 执行发布配置文件,该命令会在config目录下生成配置文件

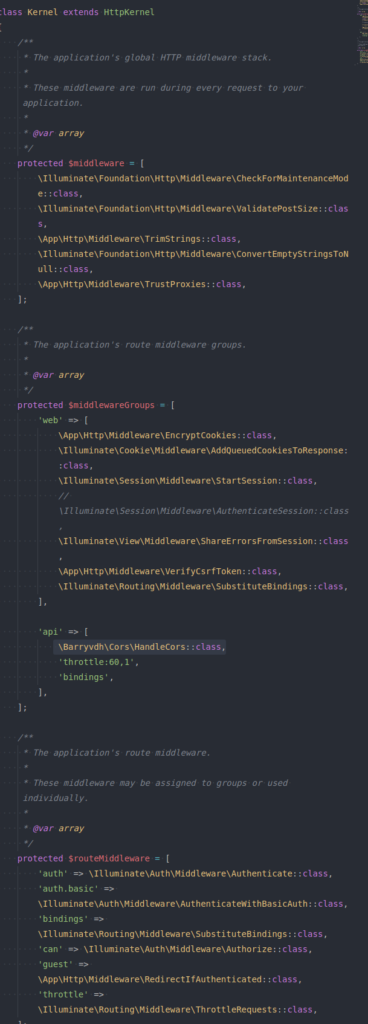
3.根据你的需求讲扩展包中的 \Barryvdh\Cors\HandleCors::class,  中间件添加到 全局中间件 ,中间组,路由中间件中。

如图所示添加到api路由组中间件中

4.根据需求修改配置文件,设置允许的请求来源,请求头 和请求方

 特别注意,该扩展包会在浏览器使用ajax请求时,根据配置自动添加响应头,非ajax请求并不会添加响应头.

  使用不允许的请求源或请求头和方法是会返回403

补充

该扩展包在异常响应时不会响应设置的跨域请求头,尤其是在结合框架自带的表单验证响应422时,会造成跨域

建议使用php原生header写法

laravel 7以后 官方已经集成了该扩展包